Assigning Table Numbers to a Layout
You can assign custom table numbers to any tables in a layout, and optionally display those numbers onscreen.
- In a scene layout, click/tap the Number Items sidebar option.
- Click/tap the Edit button
 , located on the upper left-hand corner of your screen.
Result: The Number Tables panel appears along the right side of the screen.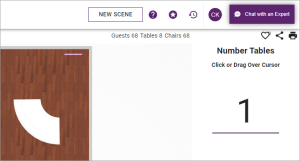
- Click/tap in the large number under the Number Tables panel on the right of the screen to edit the starting table number, or accept the default.
Note: The first table you click will default to the starting number entered here and as you click other tables they will be numbered sequentially. - Click/tap any table to assign it the default number listed in the Number Tables panel.
Result: The selected table shows that number and the large number at the right of your screen automatically increments. - Click/tap another table to assign it the next number and repeat as desired, or drag over any group of tables to incrementally number as you drag.
- [Optional] At any point you can edit the large number in the Number Tables panel to set it to a different number.
- [Optional] Click/tap any table a second time to reassign it a new number.
Note: When selected, tables will always be assigned the number currently displayed in the Number Tables panel; this number will automatically increment. - When finished, click/tap the Save button
 at the top left of the screen to save your changes.
See Also: